This is a work-in-progress project; I’m using this post to document the progress!
So, I’ve been into 3D printing since I got my Creality Ender 3 last year, and I thought that things could be a bit more interesting with a delta-style printer. My choice was the FLSUN QQ-S Pro, which has a larger build volume than the Ender 3 and has a relatively small, but solid, community on Facebook behind it.
During the first print, a couple of ideas formed in my head about how to make the printer quieter. I like to leave the printers running during the night, and my workspace is shared with the printers, so quieting them is a must-have for me. For my Ender 3, I’ve used the BigTreeTech E3 DIP board with TMC2208 stepper drivers, but for the QQ-S, I wanted something different. This is why my choice for the new board went to the Duet 2 Wifi, which came highly recommended even when I was debating the choice of board for the Ender 3.
I won’t go into details about the differences between the FLSUN factory HiSpeed v1.0 board and the Duet; there are several articles about that already… So, here’s the process :)
Hardware setup
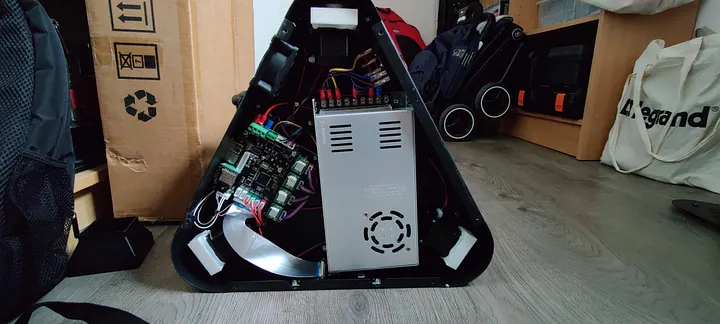
It started out with the quite neatly organised factory setup. I was actually impressed, after the job Creality did on the Ender 3!
Some odd things to note:
- The heated bed’s positive lead comes from the PSU, while the negative is attached to the board.
- The Z probe’s lead was broken into two parts.
- The stepper motors got dampers on them (under the white covers), which was a pleasant surprise after hearing a lot about bent mounting profiles due to over-tensioning.
Wiring the Duet
The wiring should be pretty straightforward… with a couple of caveats (as always). FLSUN made a couple of interesting design choices, which are listed below.
An important thing to note is that there are three ways of approaching this:
- The clean way (which involves recrimping all the connectors)
- The hacky way (which is the flush-cutter treatment on the JST connectors)
- The optional way (this one requires a considerable amount of Dupont jumper cables)
The choice is yours!
A couple of things to look out for:
- The wires aren’t marked, so you’ll need to mark them first!
- The stepper connections are good as they are!
- The endstops are normally closed switches, so the pins have to be adjusted accordingly (the 3V3 and STP pins must be populated).
Take these with a grain of salt, as the cables’ colour coding may change depending on the unit. Be sure to double-check it!
And the sketchy part (FLSUN’s design choices):
- The (−) of the bed heater was wired to the board, and the (+) to the PSU.
- The purple wire is the common GND for the probe and the hot-end fan.
- The green/turquoise wire is a common (+) for the hot-end and part-cooling fans.
- The single black wire is the PWM-controlled part of the part-cooling fan.
Mounting
For mounting the board, you can use this bracket on Thingiverse.
What I’m going to do at this point is move the PSU to the outside and get the board up and running. This way I can print a mounting plate that uses the old stand-offs, so the board can be mounted properly. After that, the PSU will get a case, for life-protection reasons…
FYI, at the moment I’m thinking that just about any board replacement will be hindered by the creative ways the original wiring was done…
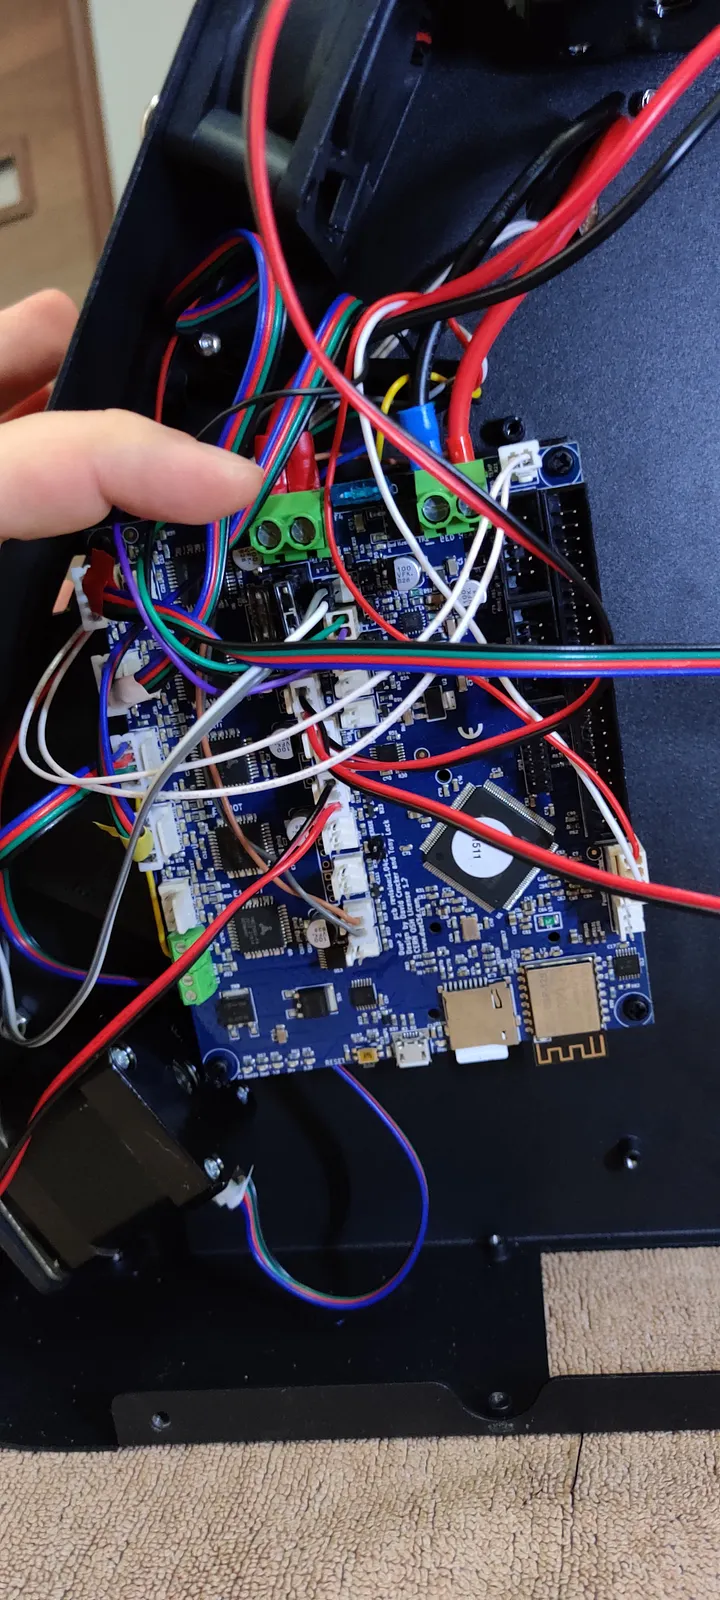
This is the wiring… for now, at least… I’m planning to add another extruder with a Y splitter on the Bowden tube in the near future.
The probe
As I was going around the forums, trouble with the probe came up multiple times; the reason may be the “creative” wiring mentioned above. BTW, the probe is a normally closed switch. I haven’t seen a config option for that in the online RepRap config tool… But at least I’ve managed to get the probe to react on the Duet’s dashboard!
Turns out, wiring the probe is different between firmwares. As it’s highly recommended to upgrade to the latest, I’ll only cover RepRapFirmware 3.
You’ll need to use the Z-probe pins (as seen on the wiring image). Don’t listen to the online configuration tool, and there will be necessary changes to the generated code as well.
Software
Having an online configuration tool for RepRapFirmware is a huge advantage over Marlin and makes things a lot easier.
Below is my working config.json file, which you can feed to the configurator to base your setup on. Only one thing to note: for the Z probe to work, you’ll need one adjustment after uploading the resulting G-code files.
In your uploaded config.g file, the first line under Z-Probe has to have its logic inverted. To do that, you’ll have to add a ! in the C attribute, like this:
If you’ve done this correctly, the Z probe should show a 0 value on the dashboard, instead of a red 1000.
1{2 "board": "duetwifi10",3 "expansion_boards": [],4 "firmware": 3,5 "standalone": true,6 "nvram": false,7 "auto_save": {8 "enabled": true,9 "save_threshold": 10,10 "resume_threshold": 11,11 "gcodes_to_run": "M913 X0 Y0 G91 M83 G1 Z3 E-5 F1000"12 },13 "display": {14 "type": 0,15 "encoder_steps": 4,16 "spi_frequency": 2000000,17 "menus": [{ "name": "main", "value": "" }],18 "images": []19 },20 "panelDue": false,21 "geometry": {22 "type": "delta",23 "mins": [0, 0, 0],24 "maxes": [230, 210, 200],25 "delta_radius": 130,26 "homed_height": 320,27 "low_dive_height": false,28 "max_carriage_travel": 450,29 "print_radius": 130,30 "rod_length": 280,31 "z_min": 032 },33 "drives": [34 {35 "direction": 0,36 "microstepping": 16,37 "microstepping_interpolation": true,38 "steps_per_mm": 100,39 "instant_dv": 20,40 "max_speed": 200,41 "acceleration": 1000,42 "current": 1000,43 "driver": 0,44 "driver_v3": "0.0",45 "endstop_pin": "xstop",46 "endstop_type": 1,47 "endstop_location": 248 },49 {50 "direction": 0,51 "microstepping": 16,52 "microstepping_interpolation": true,53 "steps_per_mm": 100,54 "instant_dv": 20,55 "max_speed": 200,56 "acceleration": 1000,57 "current": 1000,58 "driver": 1,59 "driver_v3": "0.1",60 "endstop_pin": "ystop",61 "endstop_type": 1,62 "endstop_location": 263 },64 {65 "direction": 0,66 "microstepping": 16,67 "microstepping_interpolation": true,68 "steps_per_mm": 100,69 "instant_dv": 20,70 "max_speed": 200,71 "acceleration": 1000,72 "current": 1000,73 "driver": 2,74 "driver_v3": "0.2",75 "endstop_pin": "zstop",76 "endstop": null,77 "endstop_type": 1,78 "endstop_location": 279 },80 {81 "direction": 1,82 "microstepping": 16,83 "microstepping_interpolation": true,84 "steps_per_mm": 417,85 "instant_dv": 20,86 "max_speed": 200,87 "acceleration": 1000,88 "current": 800,89 "driver": 3,90 "driver_v3": "0.3"91 }92 ],93 "idle": { "used": true, "factor": 30, "timeout": 30 },94 "homing_speed_fast": 30,95 "homing_speed_slow": 6,96 "travel_speed": 100,97 "z_dive_height": 5,98 "slow_homing": false,99 "probe": {100 "type": "switch",101 "recovery_time": 0.4,102 "trigger_height": 16.2,103 "trigger_value": 500,104 "x_offset": 0,105 "y_offset": 0,106 "speed": 2,107 "deploy": false,108 "points": [109 { "x": 0, "y": 84.9, "z": 0 },110 { "x": 73.53, "y": -42.45, "z": 0 },111 { "x": -73.53, "y": -42.45, "z": 0 },112 { "x": 0, "y": 42.4, "z": 0 },113 { "x": 36.72, "y": -21.2, "z": 0 },114 { "x": -36.72, "y": -21.2, "z": 0 },115 { "x": 0, "y": 0, "z": 0 }116 ],117 "pwm_channel": 3,118 "pwm_inverted": true,119 "pwm_pin": null,120 "input_pin": "zprobe.in",121 "modulation_pin": null122 },123 "bed_is_nozzle": false,124 "bed": { "present": true, "use_pid": false, "heater": 0 },125 "chamber": { "present": false, "use_pid": false, "heater": 2 },126 "heaters": [127 {128 "temp_limit": 120,129 "scale_factor": 100,130 "series": 4700,131 "thermistor": 100000,132 "beta": 4092,133 "c": 0,134 "channel": 0,135 "sensor": 0,136 "output_pin": "bedheat",137 "sensor_type": "thermistor",138 "sensor_pin": "bedtemp"139 },140 {141 "temp_limit": 260,142 "scale_factor": 100,143 "series": 4700,144 "thermistor": 100000,145 "beta": 4092,146 "c": 0,147 "channel": 1,148 "sensor": 1,149 "output_pin": "e0heat",150 "sensor_type": "thermistor",151 "sensor_pin": "e0temp"152 }153 ],154 "num_nozzles": 1,155 "toolchange_wait_for_temperatures": true,156 "generate_t_code": true,157 "tools": [158 {159 "mix_ratio": [],160 "number": 0,161 "name": "HotEnd",162 "extruders": [0],163 "heaters": [1],164 "fans": [0],165 "x_offset": 0,166 "y_offset": 0,167 "z_offset": 0168 }169 ],170 "compensation_x_offset": 15,171 "compensation_y_offset": 15,172 "peripheral_points": 3,173 "halfway_points": 3,174 "calibration_factors": 6,175 "probe_radius": 130,176 "mesh": {177 "x_min": 15,178 "x_max": 215,179 "y_min": 15,180 "y_max": 195,181 "radius": 85,182 "spacing": 20183 },184 "home_first": false,185 "orthogonal": {186 "compensation": false,187 "height": 50,188 "deviations": [0, 0, 0]189 },190 "network": {191 "enabled": true,192 "mac_address": "",193 "name": "Legionare",194 "password": "",195 "ssid": "",196 "ssid_password": "",197 "dhcp": true,198 "ip": "192.168.1.20",199 "netmask": "255.255.255.0",200 "gateway": "192.168.1.254",201 "protocols": { "http": true, "ftp": false, "telnet": false }202 },203 "fans": [204 {205 "name": "Effector",206 "value": 0,207 "inverted": false,208 "frequency": 500,209 "thermostatic": false,210 "heaters": [1],211 "trigger_temperature": 45,212 "output_pin": "fan0"213 }214 ],215 "custom_settings": "M307 H0 A109.6 C363.9 D0.2 V23.9 B0"216}Some troubleshooting
If you get heater errors like:
Error: Heater 0 fault: temperature rising much more slowly than the expected 1.8°C/sec
you can do a heater calibration. The details are in the Duet documentation on connecting thermistors; just don’t forget to adjust the example G-code based on which heater you’re tuning.